So I’ve been searching for the perfect toddler T-shirt pattern for a while. I’ve tried making my own, and I never get the neck proportion right. I also tried sizing down a larger kids’ pattern to fix my Max (who is almost two-and-a-half). But the results were less than great.
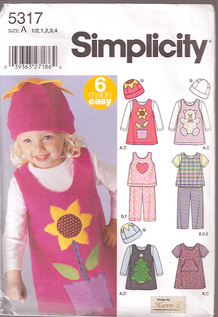
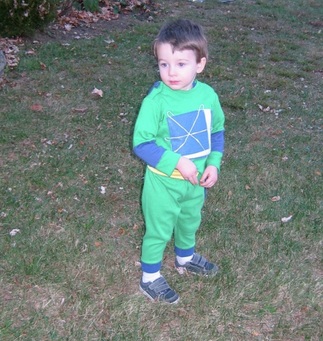
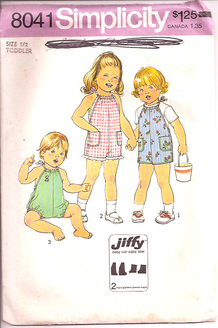
Finally, I’ve found my go-to T-shirt pattern and I love it! It’s Simplicity 5317, and though the main draw of the pattern is probably the cute jumper, the T-shirt is just right for what I need.
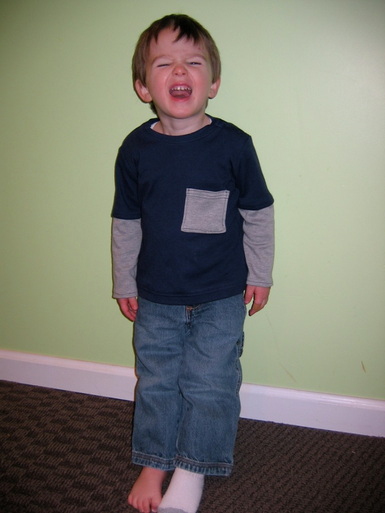
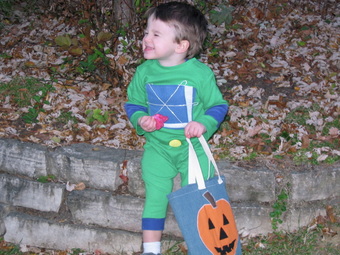
I first made the shirt for Max’s SuperWhy! costume for Halloween, which I wrote about here. But now I’m making him some versions (without the fancy SuperWhy! logo) that he can wear to preschool or around the house. Here is my first attempt (and don't ask me where his other sock is).
I think my problem with my own pattern attempts was that I was making the neckband too wide, and not under-stitching the right way. (This pattern leads you through how to under-stitch, if you don’t know what I’m talking about, though I don’t think it calls it that.)
For this version, I decided to do faux layered sleeves, since that seemed to add a good “boy” element. It’s very simple to do: I just folded the sleeve pattern piece at the line where it says to cut for short sleeves, and added a half-inch at the bottom for the hem. I cut two sleeves (from the main fabric) using that. Then I re-folded the sleeve pattern piece so that I was cutting just the bottom part of the sleeve, and I added about a half-inch at the top for the seam. I cut two sleeve bottoms out of my contrast (grey) fabric. To make the sleeve: I folded the bottom edge of the top sleeve piece under 1/2” and pressed. Then I placed the top raw edge of the bottom contrast piece flush with the top raw edge of the fold on the wrong side and stitched it. That way, you’re hemming the top part of the sleeve and attaching the bottom part in just one step.
I also added a pocket—just a basic 3 – 1/2” square, top-stitched all around, with multiple lines of top-stitching in contrasting thread (I actually didn’t do that great of a job keeping these lines perfectly straight). I was considering getting rid of the snaps on the shoulder because the neck hole seemed large enough, but then I realized that the snaps would prevent the neck from getting stretched out. Oh, I also had to add length to the bottom of the shirt—about two inches. (I still took a 1 – 1/4” hem.)
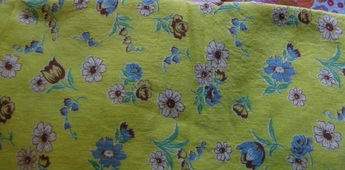
I used Jo-Ann’s Sew Classic Knit fabric (I think this is it), which I love because it’s super soft, but not so flimsy as to be difficult to work with. They often run it 40% or 50% off. If you want more info on finding knits, check out Meg’s excellent post on knits at Sew Liberated.
I’ve got more knits and more T-shirt customizing ideas. Next up: creating stripes!
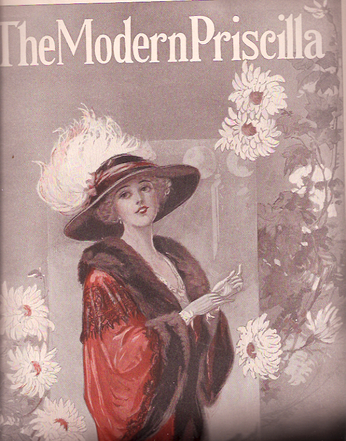
One of my favorite things to do when I need some inspiration for a designing a new project is looking through old women’s magazines. I have a stack of Needlecraft magazines from the 1920s and 1930s, as well a bunch of Modern Priscilla magazines from the teens. If you’re interested, old magazines like this are fairly easy to find on eBay. I’ve collected most of mine at vintage markets (I can usually buy them for $2 to $5 each).
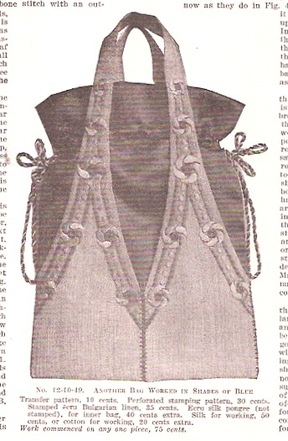
Anyway, I’ve been looking for ideas for holiday gift sewing, and I came across this lovely idea for a purse from the October 1912 issue of Modern Priscilla. It’s from a story about embellishing with needlework; I can’t replicate handwork as lovely and intricate as this, but I love the overall structure of this purse: handles that wrap around the whole front of the body and provide a skeleton of support for the purse. I’m hoping to create a pattern for it, and then I’ll post it in the Bonus Projects section.
I've never been one much for Halloween (I loved it as a kid, but as an adult, I've never gotten that into it). But it was fun to see Max sort-of understand what Halloween was this year. Of course, after we put on his costume and went outside, it took me 10 minutes to convince him to get off the swing-set and go trick-or-treating. But once he got the hang of (and saw candy bars getting dropped into his bag), he was into it.
I'm happy with how the SuperWhy costume turned out, except the mask (which I couldn't even get him to wear anyway). And as an added bonus, while searching for inspiration for the various parts of the costume I discovered a T-shirt pattern (Simplicity 5317) that I really love and will definitely use again (sans cape and SuperWhy logo). I've been struggling to find a good T-shirt pattern for Max all summer (my own attempts to draft one from existing shirts never worked, and the few patterns I tried weren't quite right in the neck). But I love how this one fits.
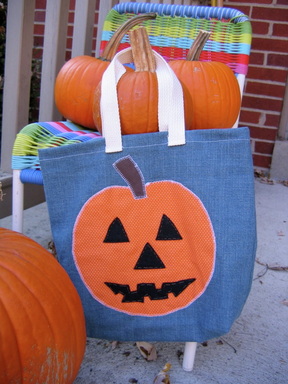
I also whipped up a fun pumpkin trick-or-treat bag (made from denim, with orange pin dots for the pumpkin and craft felt for the face). It reminded me that sometimes it's okay to just make a cute little bag without lining or finished seams or fancy details.
So I've declared tomorrow the start of my baby-weight-reduction plan. But the bowl of leftover candy begs to differ . . .
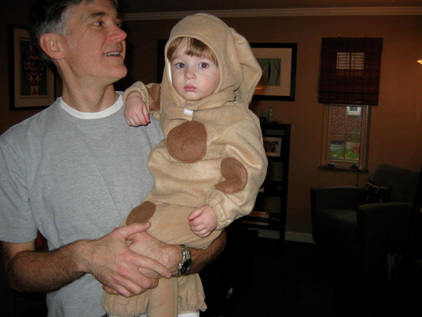
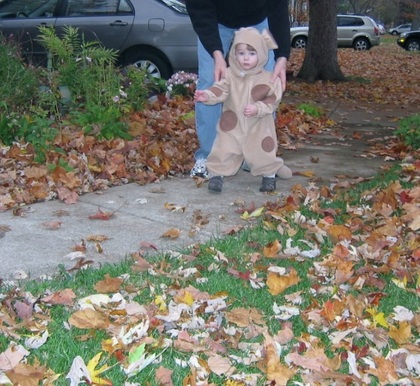
For the last several weeks, Max and I have been talking about what he is going to be for Halloween. Last year, I made him a doggy costume (Butterick 6695) which was a big hit, although getting him to stand still for five seconds to admire his doggy cuteness (or even take a picture) was challenging.
Daddy holding the wild doggy
This year, he was sort of enamored of the idea of a ghost (since Clifford was a ghost in the Clifford Halloween book). And that would have been an easy costume. We were almost going to do that, until I struck on the idea of him being Wyatt the Super Reader, from his favorite show, SuperWhy! (on PBS). He talks about SuperWhy! non-stop (everything is a Super Big Problem) and was immediately smitten. We gathered supplies for his costume yesterday at Jo-Ann’s (along with the 16,000 other parents there buying supplies for Halloween costumes). I don’t have any sort of pattern, but I’m pretty sure I can pull it off. I already have some green jammy pants I made a few months ago that are going to serve as the bottom, and then I’ll make a close-fitting green T-shirt for the top. I’m skipping the blue briefs, and just making a yellow belt. I’ll have to fake the eye mask a little. I bought some fabric sheets that can run through my printer (and then fuse to fabric) to create and fuse the SuperWhy! logo. I’ve never tried using the printable fabric sheets, so we’ll see. But if nothing else, I’m pretty sure no other kid out there will have the same costume!
Georgia, in all her baby portliness, would make a great pumpkin. But I have a feeling I’m going to wimp out this year on that. I barely have time to tie my shoes before I go out the door, so I’m guessing that making two Halloween costumes just isn’t going to happen. I’ll make her something really special next year though, when she actually has a clue what’s going on.
Actually, she probably did, because my mother pretty much tells it like it is. But I probably wasn’t listening because I’m a bit of a Pollyanna.
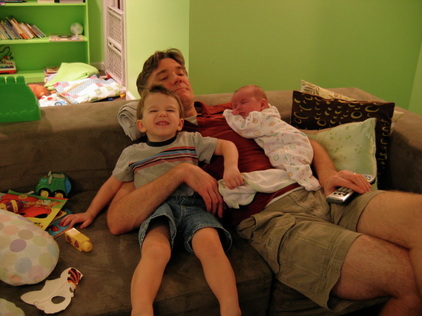
But here’s what I’ve figured out in the 19 days since my dear daughter’s birth: having two kids (spaced two years apart) is really, really, REALLY hard. The two-year-old is reaching a new level of mischief and naughtiness and the baby is, well, a newborn, which means she is an unending ball of need. Oh, there are moments where I look at the two of them, so sweet, and wonder how I am so lucky, like this rare moment of bliss! .
But those moments are few and far between on a day like today, when getting anything done seems impossible and all three of us have spent half the morning crying! My husband is a stay-at-home-dad, which is an awesome situation (we realize how lucky we are). But nonetheless, it’s challenging, especially since I’m trying to transition back to work (but realize I can’t very well leave him to tend to Max, plus a screaming infant).
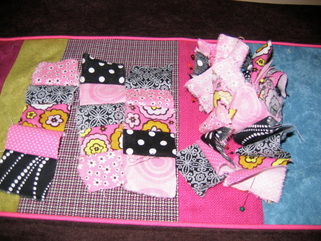
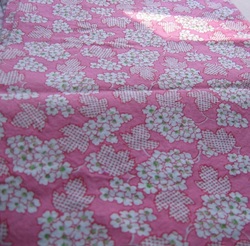
So, I’m taking a few minutes to turn to patchwork. I want to make a tiny patchworked iPod holder (I’ll put up the tutorial when I’m finished), but it’s hard to get inspired to sit at the sewing machine today, even amidst all of this lovely pink and black fabric.
I guess it’s just one day at a time, right? Right? Sigh.
In the two years since I had my last baby, I've forgotten a lot. Like how utterly exhausting those cute little blobs are! I had this idea that I would just have all kinds of time to catch up on everything after she was born.
Um, no.
You'd think I'd know better! But it is easy to forget how much time and attention they need. I'm such a routine-craving person that I am desperately trying to get Georgia on a schedule, but I know it's pretty much futile at this point (she's only 12 days old, after all). So free time seems elusive these days!
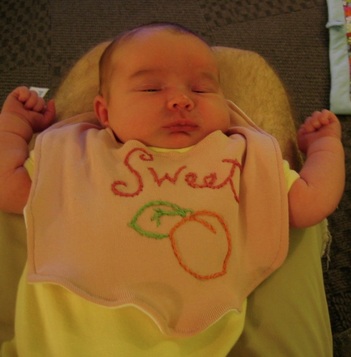
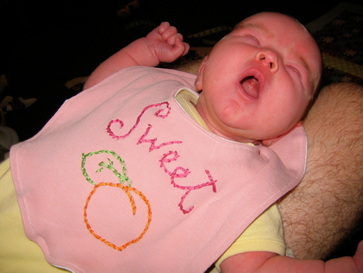
However, I did manage to make this cute bib! We've gotten some super cute girl clothes, but are still loaded down with lots and lots of boy-themed bibs. I don't mind--I'll put a bib with a football on her since it's just going to get spit up on in two seconds. But I wanted a few girly bibs for company and outings. I embroidered this "sweet peach" bib in between (very frequent) nursings. I repurposed an old pink maternity top that I never wanted to see again.
My little Georgia peach
I had never embroidered on knit before, and it's a little trickier than I thought. I used some interfacing as a stabilizer, but I probably didn't use the right kind (I just grabbed whatever I had in my stash). My stitches certainly aren't perfect. And my top-stitching is crooked too. But it was nice to just steal away to my sewing room for a few minutes while she was napping to get it finished! As I wrote about a few weeks ago, I have a whole catalog of projects I want to make, but all in good time.
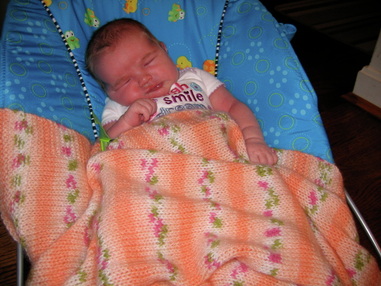
Speaking of projects, I'm loving this gorgeous blanket my friend, Andrea, knitted for Georgia. As I said, we're overrun with blue, green, yellow and boy-themed stuff, so it's nice to have something girly, but still with a sort of mod feel.
Now that I’m in the final days of the baby countdown (I’m due Friday!), I’m dreaming of all the things I want to make after the baby comes. Of course, I’ve got a ton of things I want to make for the baby, but have been holding off just in case it’s not a girl (a foot was hiding some stuff in the ultrasound, so the tech was only 90% sure it was a girl). And selfishly, I can’t wait to have my body back so that I can make things for myself.
So, what’s on my list?
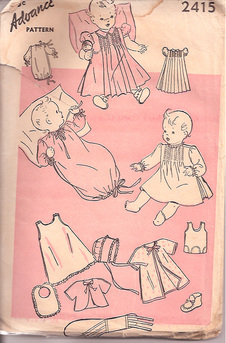
First is a little slip dress, front-tie sweater, and bonnet from this Advance pattern from the 1940s. I like the pleated dress too, but I’m not crazy about the neckline (looks uncomfy for baby) and I don’t know that I want to go to the trouble to modify it.
I’m thinking of using this sweet pink striped shirting I got at Mood last time I was in NYC for the dress and bonnet, and maybe doing another dress from the great yellow flowered feedsack I picked up on eBay.
Feedsacks go super cheap on eBay!
I also can’t wait to make this circa 1970s Simplicity romper for next summer.
I picked up this adorable pink and green retro-looking floral at Purl Patchwork earlier this year in NYC after I found out it was probably a girl, and have been waiting for inspiration.
As for mama sewing, I’m drafting a pattern for simple shirt I can wear to nurse, made from knit with a crossed bodice and empire waist. I don’t know if it will work or not, but I have a yard or so of this pretty knit that I got for a steal, so I thought I’d give it a try. I’m only in the muslin stage, but I’ll share once I’m further along (and able to actually measure myself accurately). Ideally, I’ll be able to use this piece of vintage-looking ribbon that’s been in my stash forever to accent the front, but we’ll see.
Next, I can’t wait to try making this vintage Simplicity sheath dress! I’ll probably modify the neckline because I like a slightly lower one, but I love the overall silhouette!
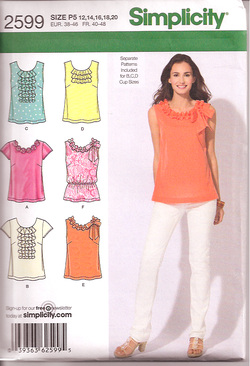
I've also had this lovely blouse pattern for a while—I picked it up after Amy Karol blogged about it. I’m a total sucker for ruffles lately. I’m leaning toward option D, or maybe E without the bow.
I actually bought the fabric at Purl earlier this year (this awesome Anna Maria Horner print). I think it will drape lovely on those ruffles. Speaking of Anna Maria, I just ordered her Roudabout Dress pattern too, so add that to the list!
Continuing with my ruffle fascination, I saw this super cute cardigan in Banana Republic’s ad in the September InStyle issue. I feel certain I could make a version of this—it’s a super simple silhouette with rows of raw edge ruffles, gathered in the middle. I’m still sorting that one out in my head. A soft knit for the cardigan and then a cotton woven for the ruffles? I definitely want frayed-edge ruffles.
And lastly, I’m dropping hints all over the place to my husband to buy Kay Whitt’s new book, Sew Serendipity, for my birthday next week. I have oogled this book like crazy. She’s got tons of beautiful dresses, skirts, and tunics. And yes, ruffles!
Of course, I know I’ll be sleep-deprived for a while, and sewing may not be #1 on my list at first. But I also know that I can’t stay away, not when I’ve got all these patterns and fabrics shouting my name!
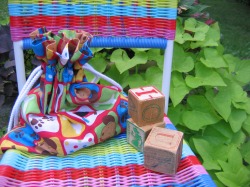
A few weeks ago, I came across some fabulous vintage wood blocks at the Burlington Antique Show. I knew they’d be perfect for my Max, who is in a major block-stacking phase, so I bought a dozen and stashed them away for his birthday. As his 2-year birthday (which was yesterday!) drew closer and I started wrapping presents, I realized that what I really needed was a little drawstring bag to put them in, so they didn’t wind up scattered everywhere. Finding the fabric was easy (puppies!). But it took me a while to remember how to make a drawstring bag, where the drawstring cinches up from each side. I knew I had made one in home ec many years ago. But to actually figure out where to put the buttonholes and how to thread the cording, I had to scrutinize a little drawstring jewelry pouch of mine. I discovered that it’s actually super easy to make a basic drawstring bag!
The puppy one I made isn’t lined (it is just for blocks, after all), so I had to fold the top down to create a casing. No problem.
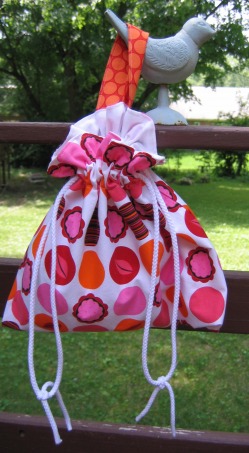
But as I’ve been prepping for the big CHA Craft Supershow this week, I realized that having another drawstring bag—one to store some of my make-and-take supplies in—would be great. But this one needed to be lined (and not have puppies on it). I discovered that the cool thing about lining it is that you don’t even have to fold the fabric down to create a casing—the layers of fabric automatically create a space for your drawstring. I also decided to add a little tab for hanging the bag up (so that I don’t have to hang by the cording). I love my drawstring bags so much, I might just switch to all-drawstring, all-the-time! I’d really like to incorporate some vintage elements, like handkerchiefs (like I’m thinking of using a handkerchief to make a mini drawstring bag to hold my iPod when it’s not on my armband).
I’m working on writing the directions to make this a bonus project on the site. That’s coming soon!


 RSS Feed